Isometric Illustration Tips for Adobe Illustrator
(Updated in 2025) Here are my favorite quick resources and tips for isometric illustration in Adobe Illustrator. In this post, I highlight:
How to create a custom isometric grid.
The formula for creating isometric artwork in the correct perspective.
Using Classic Illustrator 3D Effects for quick isometric shapes.
How I used these techniques in an illustration project.
How to make isometric text and type labels.
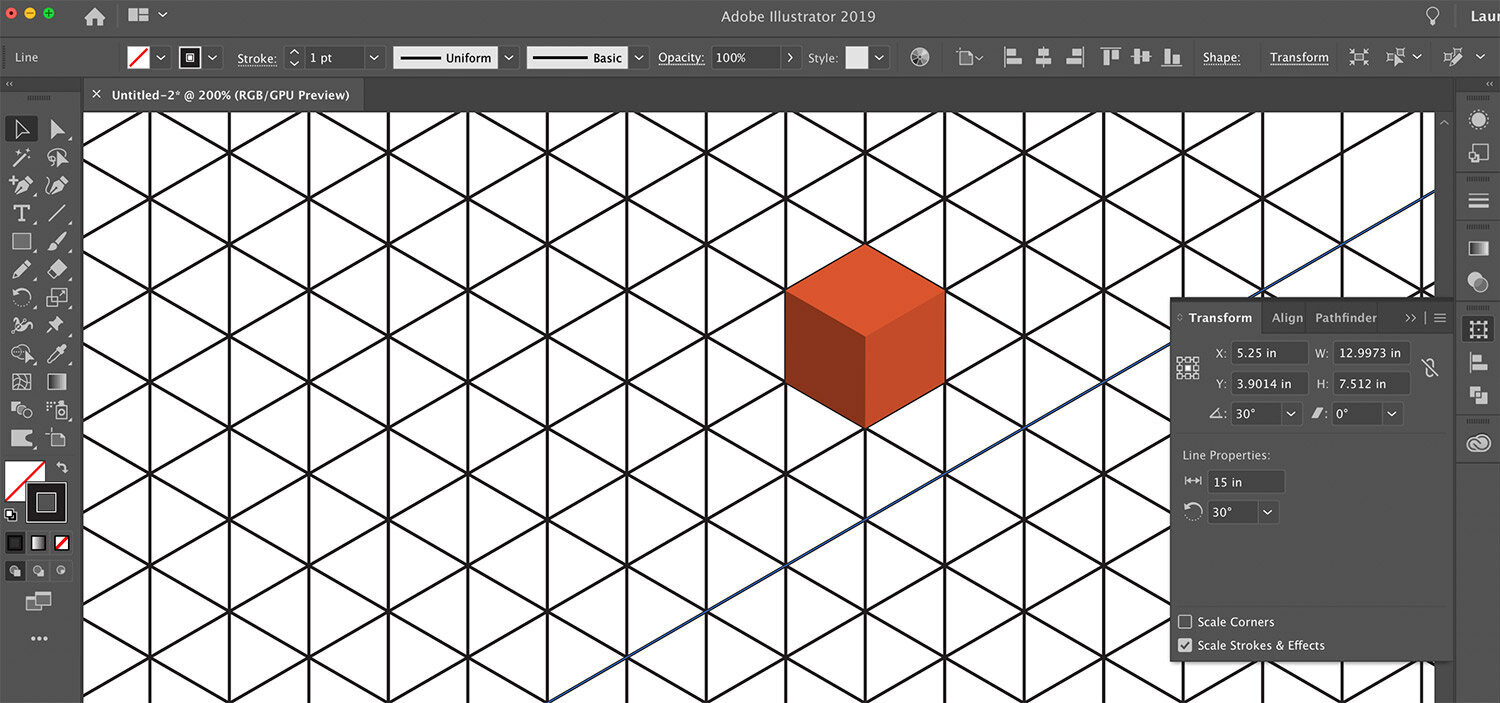
Custom Grids and the Line Segment Tool
The often-overlooked Line Segment Tool is my preferred tool for creating grids in Adobe Illustrator. Unlike paths created with the Pen Tool, line segments can be updated in the Transform Panel if you need to change the line length or angle later.
Summary of Provost’s tutorial:
Draw the first vertical line of your isometric grid with the Line Segment tool down the left edge of your artboard.
In Preferences > General, set Keyboard Increment to your desired line spacing. (I set my spacing to 28 px.)
Duplicate the line by holding Option/Alt as you press the right arrow key on your keyboard, and continue to cover the artboard with evenly spaced lines.
Group all of the vertical lines.
Select the group and double-click the Rotate tool. Enter 60º and choose Copy.
Use the shortcut Command/Ctrl+D, to duplicate step 5. You now have an isometric grid with 3 groups of lines.
If diagonal grid lines need lengthening, select a group of lines, ungroup, and change their length (all lines at once) in the Transform Panel. Then regroup the lines.
The Isometric Perspective Formula
Grab your calculators! With a few simple measurements plugged into the formula below you can figure out the cube face measurement, and easily create 3D blocks using Illustrator’s 3D effects.
Go back to the original measurement you used to space out your isometric grid lines, mine is 28 px. We’ll call this number x. Here’s a formula to try out:
Divide x by .866
The resulting number is the height between grid intersections. (32.22 px is the height I get)
Multiply the height by 1.225 (3.22 x 1.225 = 39.6)
The resulting number is the cube face measurement, hang on to this number for the next step. (39.6 px is the cube face measurement for this example)
Use 3D Live Effects in Illustrator
Illustrator has added new 3D effects in recent years, but the classic 3D effects are still the best option here. You’ll find them under Effect > 3D and Materials > 3D (Classic).

The Classic 3D effects in Illustrator are still incredibly useful!
Once you’ve created your grid, you can populate it with (almost) perfectly sized 3D cubes using live effects.
I use these starter shapes for buildings and components or as the framework for more complex art.
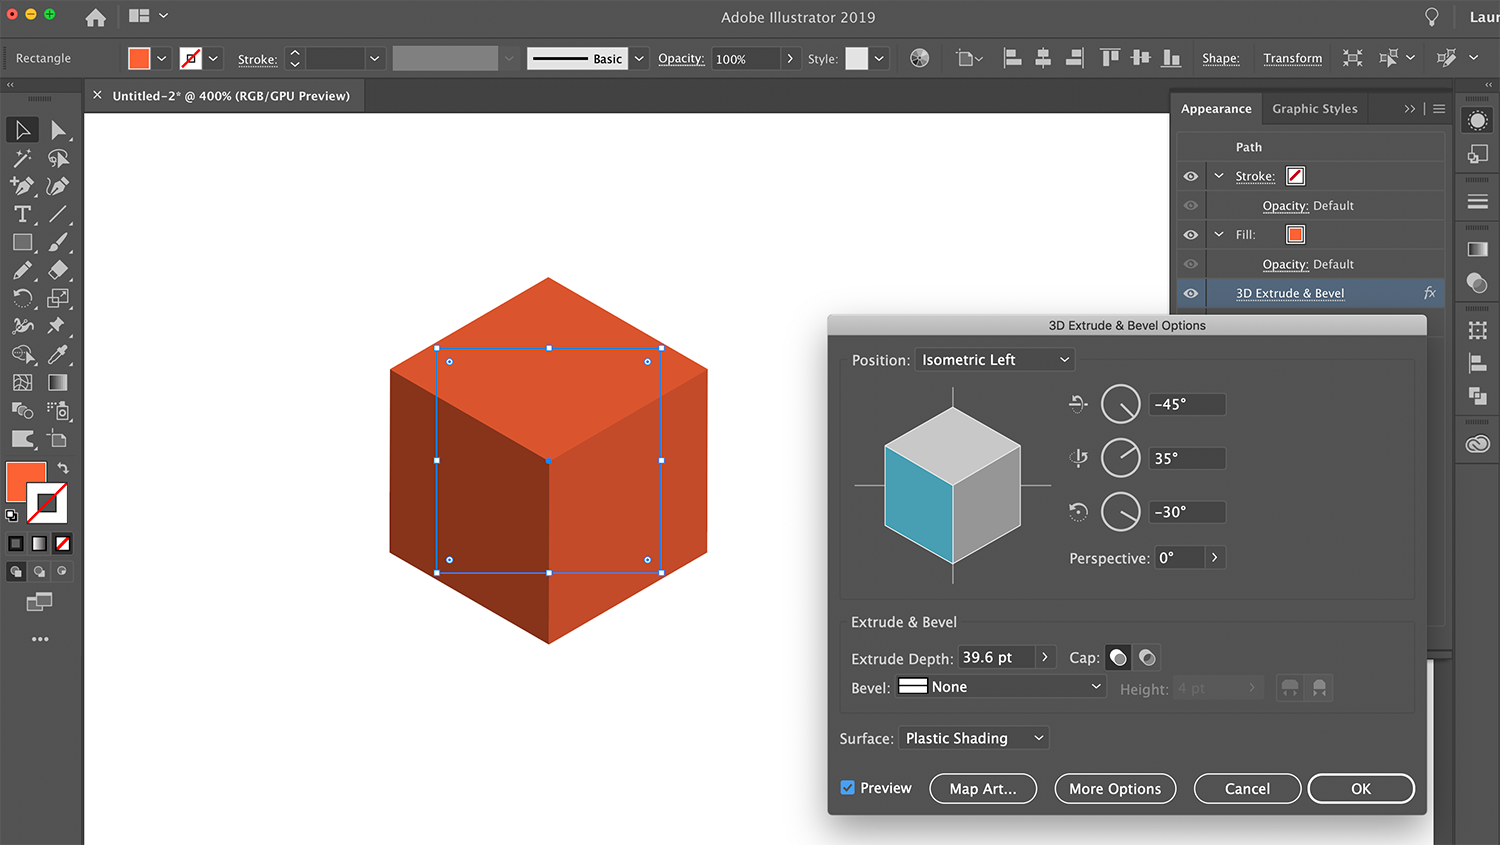
Take the cube face measurement from the formula above (mine is 39.6 px) and draw a perfect square that size.
Choose Effect > 3D Extrude & Bevel, then from the Position menu choose one of the Isometric settings.
Set the Extrude Depth to the same number (39.6 px) and press ok.
Voila! Instant cube that fits on your new grid. Position it using Smart Guides to align the center of the cube to a grid intersection.
Play with the different Isometric position settings, changing the extrude depth. Isometric Top works for tall buildings. The beauty of this Live Effect is that you can scale the 3D shape, retaining the 3D Effect.
Expand the Artwork and Create!
When you’ve finished editing the 3D shape, make a copy and expand it, Object > Expand Appearance. Then ungroup it to work with the resulting paths. Customize the shape with gradient fills, pattern fills and more.

This is an illustration I created for CreativePro Week using the grid and isometric illustration formula above.
Astute Graphics’ AG Shear Plugin
I wish I had the AG Shear live effect when I created the illustration above, it would have saved me so much time! To label an isometric Illustration and match the perspective, a live effect makes it easy to update all the text in your file. Click for a FREE trial of Astute Graphics including AG Shear!
Watch this tutorial for a demonstration of shearing type to label an isometric Illustration.
The plugin effect makes it easy to update your shear angles and apply it to new text. Learn more about all the amazing features you can add to Adobe Illustrator with Astute Graphics.
Create Isometric Actions
You can also save time in your workflow by creating actions with isometric shear angles.
Select an object to perform the action on, click New Action. Click the record button and perform the steps to the action, then click the stop button. To apply, select a type object, select an Action, and click Play.
Left Facing Iso Action: Transform panel, -30º shear, 330º rotation
Right Facing Iso Action: Transform panel, 30º shear, 30º rotation
Check out my article on CreativePro that shows how I created Illustrator actions to make type angled to fit your isometric illustration.

You may also be interested in these posts: